Why Smart Picture Annotation Changes Everything

Let's be honest, most people don't fully grasp the impact of good picture annotations. It's not just about slapping on some arrows and text—it's about creating a visual dialogue. Think of it as guiding your audience's eyes, showing them exactly what matters.
I've personally seen how transformative this can be. Educators use annotations to make lessons pop, project managers use them to clarify complex plans, and AI specialists use them for algorithm training. They all agree: effective picture annotation fundamentally changes how people understand visual information.
The Rise of Visual Communication
This isn't just a trend; it's a real shift in how we communicate. The use of image annotation has grown significantly, particularly in fields like machine learning and artificial intelligence. By 2023, image annotation tools represented a staggering 45% of the data annotation market—the largest segment. For more on this, check out this report on the data annotation tools market. This shows how annotating pictures is becoming a crucial skill for anyone working with visuals.
Clear Communication, Less Confusion
Looking for some good examples? These social media profile examples show how effective annotations can make your message stand out. Imagine trying to explain a complex design change without annotations. You'd probably end up with a confusing email chain or a long, unproductive meeting.
But a few well-placed arrows, callouts, and highlights? Instant clarity. That's the real power here: saving time, avoiding misunderstandings, and creating engaging content that resonates. In our increasingly visual world, that's a real advantage.
Finding Tools That Actually Get the Job Done
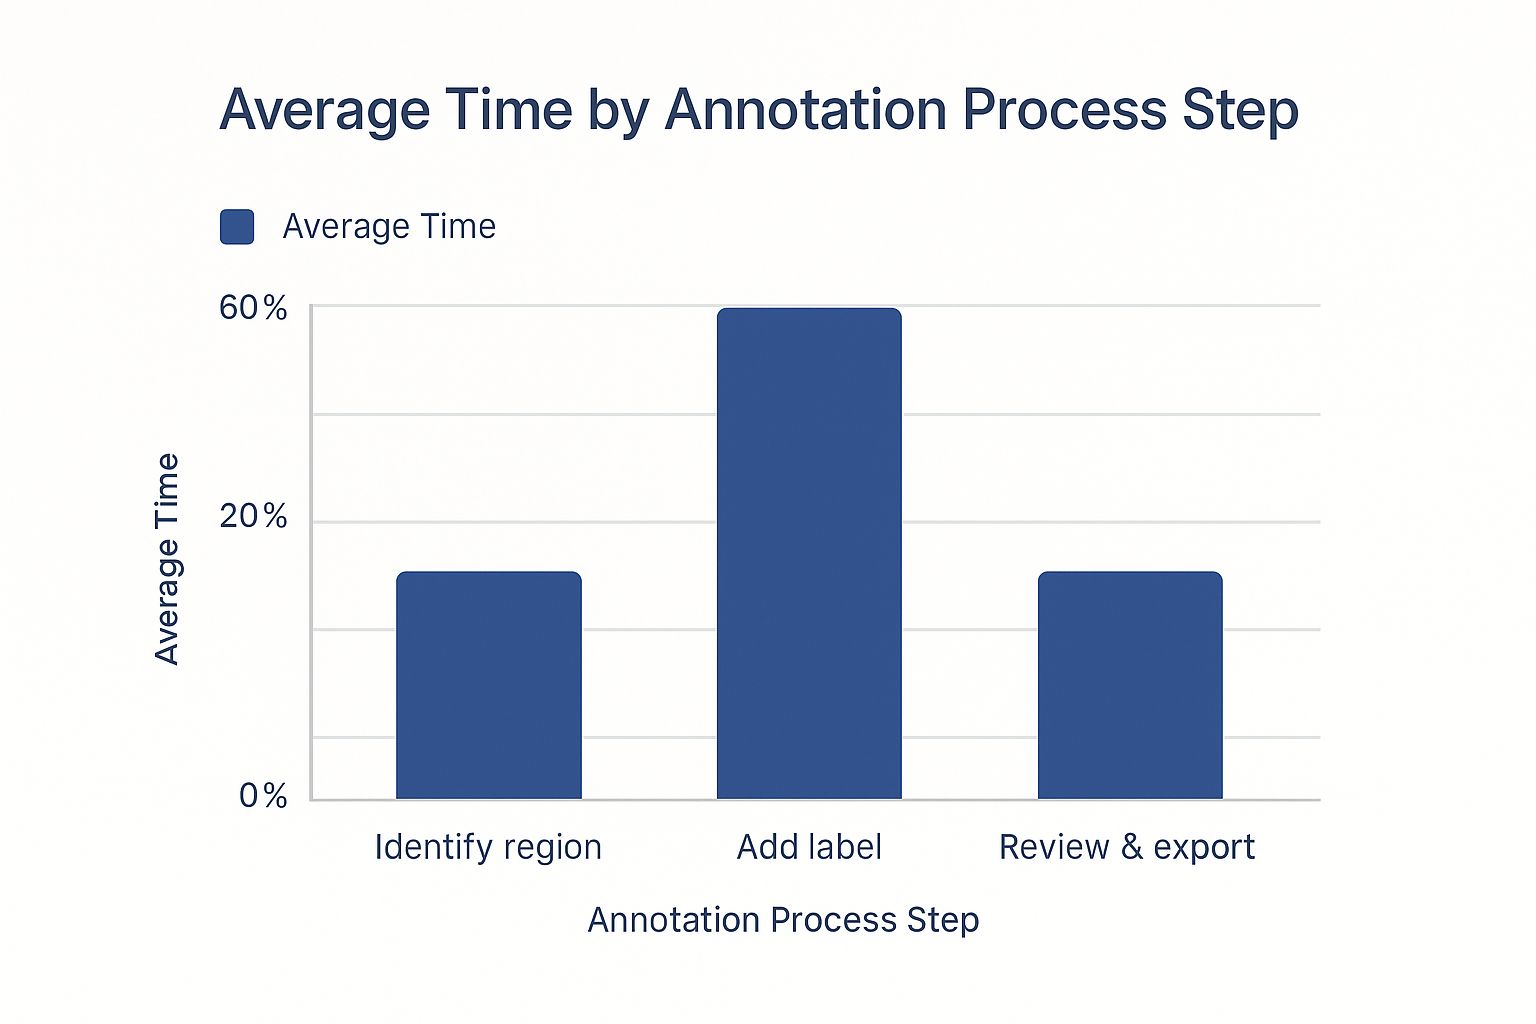
This infographic shows how much time each annotation step takes. Notice how labeling eats up the most time, while finding the area and the final review/export are much quicker. This really highlights why a smooth labeling tool is so important. Let's skip the generic software lists and get to the good stuff. I've talked to people who annotate visuals all day, and they've given me the inside scoop on what actually works.
Free Doesn't Mean Weak
Don't think you always need to spend a fortune. Free tools can be surprisingly good for basic annotation. Think about the built-in markup on your operating system, or simple browser extensions. For example, I use Preview on macOS all the time for quick markups with shapes, text, and even signatures. Honestly, for simple stuff, these often beat expensive software.
For more advanced needs, check out this comparison:
Annotation Tools Comparison: Features vs. Price
A comprehensive comparison of popular annotation tools showing key features, pricing tiers, and best use cases
| Tool Name | Key Features | Price Range | Best For | Platform Support |
|---|---|---|---|---|
| Preview (macOS) | Basic shapes, text, signatures | Free | Quick markups | macOS |
| Snagit | Scrolling screenshots, video capture | Paid | Tutorials, documentation | Windows, macOS |
| Canva | Design and annotation tools | Freemium | Visual graphics | Web, mobile |
| BugSmash | Website, app, video, PDF, and audio annotation | Freemium | Team feedback and collaboration | Web |
This table shows how even free tools like Preview can be powerful for basic needs. Snagit is a great paid option for more advanced screen captures and video annotation, while Canva blends design and annotation seamlessly. For robust team collaboration, consider BugSmash for its versatility.
Premium Tools With Real Value
Sometimes, a premium tool is worth it. Snagit is a prime example. Its scrolling screenshots and video capture are lifesavers for documenting complex processes or creating tutorials. Canva, while mainly for design, has solid annotation features that make polished annotated graphics a breeze.
AI-Powered Annotation: Hype or Helper?
AI is definitely shaking things up. Some tools now boast AI-powered features like automatic object recognition and smart labeling suggestions. Some of these are genuinely promising, but be realistic. A lot of it is still early-stage and maybe not quite ready for everyday use. For related info on PDFs, our guide on how to annotate PDF documents might be helpful. The best tool really depends on your workflow and what you're annotating. Think about the image types, the complexity of your annotations, and how you'll share the final result. Do your homework and you'll save time and money on features you won't use.
Creating Annotations That Actually Communicate

Let's be honest, just slapping a bunch of arrows and boxes onto an image doesn't magically make it clearer. It's all about guiding your viewer's eye, not bombarding them with visual clutter. Think of it like good design: effective annotation uses visual hierarchy. This means some elements pop, while others fade back, creating a clear path for the eye to follow. A good Shopify Photo Editor can help you achieve this.
The Psychology of Visual Cues
Some colors and shapes naturally draw attention. A bright red circle around a key feature will jump out way faster than a pale yellow square. Understanding these subtle cues can dramatically improve your annotations.
Also, think about how much information you're adding. Too little, and your point gets buried. Too much, and it's information overload. Finding that sweet spot is the key.
Learning From the Pros
Checking out before-and-after examples from design professionals is incredibly helpful. A great resource is this guide on how to annotate in PDF.
You'll see how seemingly minor tweaks – like adjusting arrow thickness or using contrasting colors – can make a huge difference. You can then apply these techniques to your own work and watch your annotation game level up. Many people fall into common traps like using a rainbow of colors or inconsistent arrow styles. Avoiding these pitfalls instantly makes your visuals look more professional.
From Amateur to Expert
There are little tricks that separate the annotation rookies from the pros. For example, try using numbered callouts to guide your viewer through a complex process. Or add short, descriptive text next to each arrow explaining why something matters.
These small touches transform your annotations from basic markups into powerful communication tools, making your visuals much more effective at conveying information clearly.
Building a System That Saves Time and Sanity
Annotating images without a plan is like trying to bake a cake without a recipe – messy and unpredictable. Those who annotate a mountain of images regularly? They're not just lucky. They've got systems. And those systems are their secret weapon.
Consistency is Key
Imagine a team where everyone uses different colors, shapes, and terms for annotations. Total chaos, right? Establish clear standards from the get-go. For example, use a consistent color code: red for bugs, green for suggestions, and so on. This makes your annotated images instantly understandable for everyone involved. Also, think about using HTML overlays when creating annotations. A little HTML magic can really elevate your text over picture game.
Templates and Batch Processing
Reusable templates are absolute lifesavers, especially for repetitive tasks. If you often annotate similar images, a template can drastically reduce your annotation time. Similarly, learn to batch process whenever you can. Many tools let you apply the same annotations to multiple images at once, freeing up hours of your time.
Quality Control and File Management
Catching mistakes early is way better than dealing with headaches later. A simple quality check can make a big difference. Having someone else review annotations before they're final is a great way to catch errors. Fixing a small mistake early is much easier than fixing a big one later. And speaking of preventing headaches, a good file management system is a must. A clear naming convention and folder structure will save you from the dreaded "where-is-that-file" panic. Trust me, we've all been there. It's interesting to see how vital image annotation has become to modern AI. Automated data annotation tools now handle over 60% of image-based annotation workflows in large businesses.
Keyboard Shortcuts: Small Changes, Big Impact
Learn the keyboard shortcuts for your annotation tools. It seems like a small thing, but those seconds saved on each action add up – especially when you’re working with hundreds of images. Think of it as a productivity investment.
These simple systems can transform your image annotation workflow. You’ll work faster, feel less frustrated, and create higher-quality annotations. It's all about working smarter, not harder, so you can reclaim valuable time in your day.
Advanced Techniques That Set You Apart
Ready to move past basic annotations? Let's dive into some seriously cool techniques that can completely change how you give and receive visual feedback. These aren't just for show; they solve real problems I've encountered myself.
Layered Annotations for Complex Information
Ever try to mark up a huge technical diagram or a detailed medical image? Putting every single annotation on one layer is a recipe for visual overload. Trust me, I've been there.
Instead, try using layered annotations. This just means creating separate layers for different kinds of feedback. One layer could highlight key components, while another explains how they work. Think of it like a well-organized map – you choose which layers to view based on what you need to see at that moment. This keeps things clear and prevents viewers from feeling overwhelmed. If you're prepping images for AI training, layering is crucial. Check out this guide on annotating images for AI training for more specific advice.
Interactive Annotations for Engagement
Static annotations are fine, but interactive annotations really boost engagement. Imagine clickable hotspots that reveal extra details or tooltips that provide just-in-time information. It's like turning your image into a mini interactive learning experience.
This is especially helpful if you're creating training materials or interactive guides. It keeps people engaged and makes complex information more digestible. I've seen firsthand how these "Easter eggs" of information can make a real difference in how people understand and retain visual information.
Advanced Markup for Specialized Fields
Different fields have their own specific needs when it comes to annotations. For example, medical imaging often uses specialized markup languages like DICOM-SR for structured reporting. Similarly, engineering drawings often use GD&T (Geometric Dimensioning and Tolerancing) for accurate manufacturing instructions. Knowing these industry-specific methods can significantly enhance how you communicate within your field.
To illustrate the practical value of these techniques, let's look at some real-world uses across various industries:
| Industry | Common Techniques | Key Challenges | Success Metrics | Popular Tools |
|---|---|---|---|---|
| Medical Imaging | DICOM-SR, image segmentation, landmark annotation | Maintaining accuracy, interoperability | Diagnostic precision, research validity | 3D Slicer, ITK-SNAP |
| Engineering | GD&T, CAD annotations, tolerance analysis | Precision, standardization | Manufacturing consistency, quality control | AutoCAD, SolidWorks |
| Software Development | UI/UX annotations, code comments, bug reports | Clear communication, efficient workflow | Bug resolution rate, user satisfaction | BugSmash, Jira |
| E-commerce | Product image annotation, attribute tagging | Data consistency, scalability | Product discoverability, conversion rates | Labelbox, Amazon SageMaker Ground Truth |
| Autonomous Vehicles | Bounding boxes, semantic segmentation, lane marking | Data quality, handling edge cases | Model accuracy, safety performance | LabelImg, CVAT |
Knowing the best tools and techniques for your specific field is key to effective visual communication.
Real-World Examples
I recently talked to a technical writer who completely transformed a dense software architecture diagram. She did this by separating annotations into layers for different modules and functions, making the diagram so much easier to understand.
Another example? A medical educator I know uses interactive annotations to create awesome online learning modules. Students can explore anatomical structures and reveal more information as they go, which makes learning more engaging and effective. These examples show just how powerful these techniques can be. They help create clear and engaging visuals that people actually want to use.
Making Your Annotations Work for Teams
Your perfectly crafted annotations are worthless if your team can't easily understand and use them. Forget those endless email chains with attached files – true collaboration demands a smarter approach. I've picked up a few tricks over the years about making annotations actually work for teams, and trust me, it's about way more than just hitting "share."
Version Control: Preventing Annotation Chaos
Imagine multiple team members annotating the same image, each saving their own version. Talk about a headache! Version control is key to avoiding this mess. Cloud-based tools like BugSmash are lifesavers here. They allow everyone to work on the same file at the same time, tracking every change and preventing any lost work. No more guessing which version is the latest – it's all right there.
Cloud-Based Workflows: Keeping Everyone in Sync
I can't stress enough how important centralized feedback is. Think about integrating your annotation tool with your communication platform.
For example, this Slack screenshot shows a team discussing annotations right in their project channel. Keeping the conversation centralized and connected to the project makes everything so much easier. This kind of integration with tools like Slack drastically speeds up feedback and revisions.
Annotation Standards: Speaking the Same Visual Language
Just like coding style guides, having a consistent approach to annotations is crucial. Agree on a shared visual language as a team. What do specific colors represent? What shapes will you use for different feedback types? This consistency ensures everyone understands the annotations immediately. It's like having a secret code for visual feedback.
Feedback Loops and Review Processes
Quick, efficient feedback loops are essential for any project. I've found that tools with threaded comments directly on the annotations make a huge difference. No more digging through emails or chat logs – all the relevant feedback is right there with the image, crystal clear and easy to follow.
Integrating With Existing Tools
Don't add another tool to your workflow unless it's absolutely necessary. Look for an annotation platform that integrates with your team’s existing project management tools. If you’re already using Jira or Asana, find an annotation tool that connects smoothly. This keeps everything streamlined and avoids unnecessary context switching.
These practical steps might seem small, but they add up to smoother collaboration, clearer feedback, and a way more efficient annotation process. It's all about creating a shared understanding, so your annotations actually contribute to your team's success. Ready to ditch those email chains and level up your team's annotation game? Check out BugSmash for a taste of seamless collaboration and streamlined feedback.